Free Company Email ID's

Step by step procedure to create company emails ID's


  1. Go to gmail account
  2. Click on manager your google account
  3. Click on security tab
  4. enable 2 step verification
  5. Go to apps
  6. Select others in drop down menu
  7. add a personalised name for your company email 
  8. Click next to generate a code (save the code in text file)
  9. Go to the website improv mx com
  10. Add domain name & email id
  11. It will show mx records and text file records to be added 
  12. Go to Domain name provider website
  13. click on dns records
  14. add the mx records (2 nos.) in the fields with priority values 10 and 20 respectively
  15. add txt records
  16. Click save
  17. Check the status in the website improv mx and wait till it turns active.(the status must show "Email forwarding active" )
  18. now send an email to the newly created company email id 
  19. The email gets delivered instantly
  20. at this stage you cannot reply to the email using the compnay email id. for that please follow procedure as below
  21. click on the settings (gear icon) in gmail as show in the image below:
  22. click on Accounts and imports
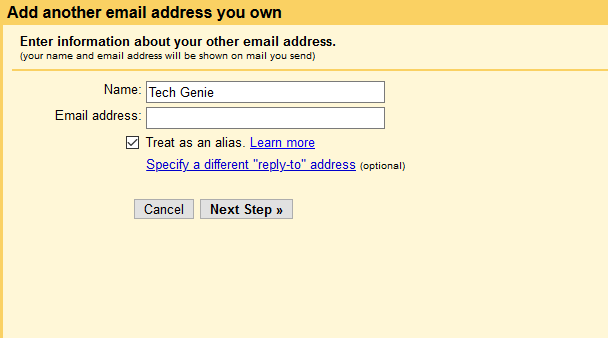
  23. Click on Add another email address
  24. Add name and email id as shown in the figure
  25. Clcik on next step
  26. Add the following details

    SMTP Server: smtp.gmail.com
    Username: (as per gmail)
    Password: (as per gmail)
    click on add next
  27. Send a replay email from the company email id
If you have any queries email me shivprasadp@gmail.com

Changing of IP Address of Moodle Server

When the IP address of  the  Moodle Server is changed the Moodle portal will not work. Hence it is required to change the ip address in the config.php file. the path by default will be

in your main Moodle directory.Server/Moodle:

The line you need to change begins with:

C:/>wwwroot Moodle Server


Hard Reset - Xolo Era HD


Procedure
  1. Press and hold Power key (2 seconds) after that immediately Press and hold Volume Down until Android System Menu appears
  2. Select "Wipe Data / Factory Reset" from Volume Down button and then Press Power key for confirm 
  3. Select "Yes — delete all user data" option using Volume Down key and Press Power for confirm 
  4. You will see Wiping data...., Formatting /data..., Formating /cache... wait until finished 
  5. Select "Reboot System Now" wait for device start in normal mode (note : Wait few minutes do not unplug battery) 
  6. Congratulation you are done 

Detailed explaination of SAN and NAS

Storage Area Networks (SANs) and Network Attached Storage (NAS) both provide networked storage solutions. A NAS is a single storage device that operates on data files, while a SAN is a local network of multiple devices.

The differences between NAS and SAN can be seen when comparing their cabling and how they're connected to the system, as well as how communication to the device occurs.

SAN vs. NAS Technology

A NAS unit includes a dedicated hardware device that connects to a local area network, usually through an Ethernet connection.

This NAS server authenticates clients and manages file operations in much the same manner as traditional file servers, through well-established network protocols.

To reduce the costs that occur with traditional file servers, NAS devices generally run an embedded operating system on simplified hardware and lack peripherals like a monitor or keyboard.

A SAN commonly utilizes Fibre Channel interconnects and connects a set of storage devices that are able to share data with one another.

SAN vs. NAS Usage Models

The administrator of a home or small business network can connect one NAS device to their local area network. The NAS maintains its own IP address comparable to computers and other TCP/IP devices. Using a software program that is provided with the NAS hardware, the network administrator can set up automatic or manual backups and file copies between the NAS and all the other connected devices.

The NAS holds many gigabytes or terabytes of data. Administrators can add additional storage capacity to their network by installing additional NAS devices, although each NAS operates independently.

Administrators of large enterprise networks may require many terabytes of centralized file storage or extremely high-speed file transfer operations.

Where installing an army of many NAS devices is not a practical option, administrators can instead install a SAN containing a high-performance disk array to provide the needed scalability and performance.

SAN/NAS Convergence

As internet technologies like ​TCP/IP and Ethernet have proliferated worldwide, some SAN products are making the transition from Fibre Channel to the same IP-based approach NAS uses. Also, with the rapid improvements in disk storage technology, today's NAS devices now offer capacities and performance that once were only possible with SAN.

These two industry factors have led to a partial convergence of NAS and SAN approaches to network storage.

Source: Bradley Mitchell

HP Laserjet 3015 All in One Printer - Memory Full Error

Please follow the below mentioned step by step procedure to resolve the issue.

Press the menu/enter button on the machine
 

Press the arrow mark(>) button once to select Fax functions , and then press menu/enter
 

Press to select Clear saved faxes , and then press menu/enter .
 

Press menu/enter to confirm deletion.

Now the machine will work normal.

ASP.net programming using Visual Studio 2012

Step by step procedure to develop web application using following:-

  1. Visual Studio 2012
  2. Oracle Database 
  3. Windows OS( Min Windows 7)
I have installed Visual Studio 2017 on windows 7 (x64 bit) machine, Oracle express edition data base.

Prerequisites for visual studio and Oracle data base integration:
  1. Download Oracle web tools for Visual Studio and install it

WP scroll theme errors

Error is shown as below:-


The parent theme is missing. Please install the “layers wp” parent theme.


(theme not display in themes selection screen) So What should you do?

Here is the solution:

You should install Layers WP. It is a free page builder theme. Install Layers WP like any WordPress theme. You must have Layers to be installed, but it does not need to be activated.

Sparky! you are did it.

Happy WP 'ing

Domain name in address bar not in order

when I visit my domain name (www.domain.com) it opens up the website but then the ip address appears in the address bar instead of the domain name. How do I change this so only the domain name appears?


UPDATE wp_options SET option_value='http://domain.com' WHERE option_name IN ('siteurl','home');

SQL Developer - Set path for Java

Solution 1: Copy and paste the path of jdk in the dialog box when asked for the path, instead of selecting java.exe 
 --------------------------------------------------------------------------------
 Solution 2
SQL Developer - Set path for Java

1) Open the file

..\sqldeveloper\sqldeveloper\bin\sqldeveloper.conf

and add the following line to set jdk path:

SetJavaHome ..

\app\hma\product\11.2.0\client_1\jdk

If it don’t allow you to save the file, copy whole sqldeveloper folder to a different location where you have write access

to modify this file.

2) Run sqldeveloper.exe (from the new place if you moved the folder out from oracle folders) as administrator and enter

the jdk path that comes with your oracle installation:

C:\Program Files\Oracle\11g\product\11.1.0\client_1\jdk\bin

It should work

Reset System and Hidden Attributes for Files or Folders Caused by Virus

This is simple method of doing it without using any software. Just run command prompt (Start -> Run -> CMD for XP, or for Vista and 7 Start -> type CMD in search box, right click and run as Admin), type the following command:
attrib -H -S C:\path\to\your\file.doc /S /D
You can also use the asterisk character to define multiple extensions. For example:
attrib -H -S C:\raymond\*.* /S /D
This would remove the Hidden and System attribute of all files in the raymond folder on the C drive. The /S and /D arguments are optional. /S will recurse down into all sub folders and /D will unhide the folders themselves if they have the System or Hidden attribute set.
Just to point out, it’s probably not the best idea to use something like “C:\*.*” as this will unhide the whole drive including files which Windows has set as hidden or system by design.
On the next page we’ll show you how to unhide/unsystem your files using even easier methods with the help software.

GroupWise unable to communicate to other servers

GroupWise unable to communicate to other servers:

Description:
Groupwise server not working, communications are happening within the post office, Users within the postoffice are able to communicate. Mails are not being delivered to other postoffices & no mails are being received from other post offices.

Troubleshoot methods:

  1. check the status of the groupwise services (#rcgrpwise status)
  2. check the log

Reason:
  1.  checked the log and found the error
  2.  Ports busy due to

Steps to be followed to rectify the problem:
  1. Goto the terminal & restart the groupwise services (#rcgrpwise restart)

Printer: Delete documents in the tray

Goto Administrative tools
Services
Stop spooler service
Start spooler service
DOne

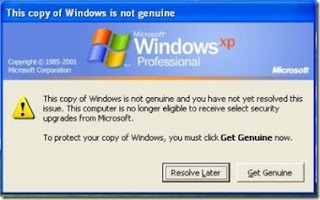
Delete windows not genuine from system tray


Procedure:-
1. Go to safe mode
  • How to goto Safe mode -->
  • (a)restart the computer
  • (b) While booting press F8 key continuously
  • (c) Select Safe mode option from the list.

2. Delete the file "wgatray.exe" in the locaton C:\Windows\System32\wgatray.exe.

3. Done

Configure BSNL AR800V v3.0 ADSL Modem

BSNL Broadband
Solution:
1. Connect LAN cable/Network Cable from the Modem to the LAN port (Network Port) of your computer. Usually BSNL will give you the Network cable.
2. In Windows, Open Internet Explorer. Then Type 192.168.1.1 in the address bar (Please check the below said image). The screen will looks like the one provided below.


BSNL Modem Login Page
3. Enter the user name and password, the default user name and password is provided below:
Username: admin
Password: admin
4. Now on the page, Go to Configuration then click on Internet settings. Then click on Edit

Configuration and Internet settings page
5. Click on the Edit icon (Please check the above provided image). The below said image will appear.

Internet Connection Configuration
6. Do not change anything, Click Next

Internet Connection Configuration
7. Click Next, Ensure that “Obtain an IP Address Automatically” is selected (Please check the below image)

Internet Connection configuration
8. Click Next, now the page will look the one provided below:

Internet Connection Configuration
In the above said page, please enter the details:
Service name: Dataone
Broadband User name: This user name will be provided by BSNL, please enter it correctly (Eg: si123456789)
Password: password (Usually the password will be password itself )
Session Established by: Always On
9. Now click Next, the last screen will look like the one provided below.

Internet Connection configuration
10. Click on Apply. Now please close the window and wait for a minute. Then check whether you are able to use Internet using the Network cable/LAN cable. If so, we are ready to proceed for Wifi/WLAN/Wireless LAN setup

Wireless settings:
1. From the Main page of the BSNL configuration page, click on “Wireless Network”. Please check below said image:

BSNL Wireless Configuration
Here are the settings you need to change:
Profile: 801.11 b/g
Wireless: Enable
Country : USA
Channel selection: auto
Select Channel: 1
Network name SSID: XYZ Wlan (You can enter any name that you wish)
Hide SSID: No
Select Security Option: Wi-Fi Protected Access
Select Authentication protocol: TKIP protocol
Select Authentication Method: PSK (Pre Shared Key)
WPA pass phrase: XYZ123 (This is the password, so ensure that you remember it)
PMK chaching: Enabled.
Ensure that you save the settings and allow 10-20 seconds to refresh the page. Then check the WLAN LED on the Router/Modem is lit.

My blog reloaded

will be updating soon

RHEL 5 CONFIGURATION

RHEL 5 CONFIGURATION..

Install Internet Information Services and the FTP Service in Windows Server 2003

Because FTP depends on Microsoft Internet Information Services (IIS), IIS and the FTP Service must be installed on the computer. To install IIS and the FTP Service, follow these steps.


NOTE: In Windows Server 2003, the FTP Service is not installed by default when you install IIS. If you already installed IIS on the computer, you must use the Add or Remove Programs tool in Control Panel to install the FTP Service.
  1. Click Start, point to Control Panel, and then click Add or Remove Programs.
  2. Click Add/Remove Windows Components.
  3. In the Components list, click Application Server, click Internet Information Services (IIS) (but do not select or clear the check box), and then click Details.
  4. Click to select the following check boxes (if they are not already selected):

Common Files
File Transfer Protocol (FTP) Service
Internet Information Services Manager

  1. Click to select the check boxes next to any other IIS-related service or subcomponent that you want to install, and then click OK.
  2. Click Next.
  3. When you are prompted, insert the Windows Server 2003 CD-ROM into the computer's CD-ROM or DVD-ROM drive or provide a path to the location of the files, and then click OK.
  4. Click Finish.

IIS and the FTP service are now installed. You must configure the FTP Service before you can use it.

Configure The FTP Service

To configure the FTP Service to allow only anonymous connections, follow these steps:

  1. Start Internet Information Services Manager or open the IIS snap-in.
  2. Expand Server_name, where Server_name is the name of the server.
  3. Expand FTP Sites
  4. Right-click Default FTP Site, and then click Properties.
  5. Click the Security Accounts tab.
  6. Click to select the Allow Anonymous Connections check box (if it is not already selected), and then click to select the Allow only anonymous connections check box.

    When you click to select the Allow only anonymous connections check box, you configure the FTP Service to allow only anonymous connections. Users cannot log on by using user names and passwords.
  7. Click the Home Directory tab.
  8. Click to select the Read and Log visits check boxes (if they are not already selected), and then click to clear the Write check box (if it is not already cleared).
  9. Click OK.
  10. Quit Internet Information Services Manager or close the IIS snap-in.

The FTP server is now configured to accept incoming FTP requests. Copy or move the files that you want to make available to the FTP publishing folder for access. The default folder is drive:\Inetpub\Ftproot, where drive is the drive on which IIS is installed.

php cli problem

Steps to make working CLI for php
OS: RHEL 5
PHP VERSION: php 5 (Lampp)

First set the path to php bin drectory, here in lampp php bin directory is /opt/lampp/bin
commands are as follows:
#export PATH=$PATH:/opt/lampp/bin
now check the php version by giving the command
#php -v

is shows the result as below:

PHP 5.2.9 (cli) (built: Mar 31 2009 23:21:47)
Copyright (c) 1997-2009 The PHP Group
Zend Engine v2.2.0, Copyright (c) 1998-2009 Zend Technologies


Convert to DVD


VSO ConvertXtoDVD 3.8.0.193f Final – Multilingual – Full
Incl. Serials ( 100% Working )
New Release: SEP28, 2009

Vso Convertxtodvd 3 8 0 193f Final - Multilingual

Information:

ConvertXtoDVD (formerly DivXtoDVD) is a software to convert and burn your videos to DVD. With ConvertXtoDVD and in a few clicks you can backup your movies to DVD playable on any home DVD player.

ConvertXtoDVD supports most popular format such Xvid, MOV, VOB, Mpeg, Mpeg4, MP4, AVI, WMV, DV and stream formats. It converts your files into a compliant DVD Video set of files and burns it on a DVD media.

The aspect ratio can be automatically selected or forced to a specific format. The program works for NTSC and PAL video formats and creates chapters automatically. Multiple audio tracks are supported. Version 2 uses a completely rewritten interface with subtitles support and a lot of new settings.

Features:
* Video formats supported: avi, divx, xvid, mov, mkv, flv, mpeg-1, mpeg2-, mpeg-4, nsv, dvr-ms, tivo, ts, ifo, vob, asf, wmv, realmedia, rm, rmvb, ogm, existing files from digital camcorders, TV/Sat, capture cards, etc. No external codecs needed like avi codec download
* Create DVD menus with different templates available, possibility to add background video, image or audio, have chapter and audio/subtitle menus
* Conversion advisor wizard, control of the conversion speed vs. quality
* Fast and quality encoder, typically less than 1 hour for converting 1 movie, and supports Multi-Core processors!
* Included burning engine with burn speed control choice of SAO or packet writing methods, supports all DVD formats
* Custom and or automatic chapter creation with markers and preview window
* Advanced file merging possibilities
* Audio formats supported internal and external: AC3, DTS, PCM, OGG, MP3, WMA and more…
* Subtitles files supported internal and external: SRT, .SUB/IDX, .SSA with color and font selection, and supports tags like italic, bold
* Video output for video standard (NTSC, PAL), TV Screen (Widescreen 16:9, Fullscreen 4:3) and DVD Resolution (Full D1, Boradcast D1, Half D1, SIF), or choose automatic for all choices listed above. Also convert video from NTSC to PAL or PAL to NTSC
* Video post processing settings like video resize-pad/cropping and de-interlacing options

* Multilingual support: English, Spanish, French, Italian, Japanese, Chinese, German, etc
* conpatible with: Windows XP, Vista, Win7 (32/64-bits)


http://hotfile.com/dl/14498937/b2431d4/Vso.ConvertXToDVD.3.8.0.193f_by.tano1221.rar.html

Dont execute code on page reload

I have an asp page which when loads, sends notification emails and adds data to a Mysql database.people refreshing the page or when navigating back to the page using the browser, this script is run again. So to stop the code to execute again on page reload insert the below code into the page.

CODE:
<%
if Request.Cookies("Mail")<>"" then
Response.Write "cant mail twice!!"
else
Response.Cookies("mail")="Ams"
Response.Write "Mailed!!"
//Put your insert/mail code here.
end if
%>